The Mauá bicycle station located near the train station is Latin America’s largest 24-hour bicycle parking facility. It was started by Companhia Paulista de Trens Metropolitanos (São Paulo Metropolitan Train Company) in collaboration with ASCOBIKE, a bicycle riders association.
For R$10.00 (approximately US$5.00) a month members can park their bicycles without fear of them getting stolen and where they can leave their bikes for repair or buy parts and accessories at discounted rates. It is also a place where they can take a break as they have access to showers and restrooms or have refreshment, like cold water or hot coffee before they continue on their journey by train.
It is also a place for their social well being as there are social workers there to provide legal services, insurance plans or provide loans for members to have their bicycles repaired or serviced if their safety riding their bicycles becomes a concern.
Can we see this happening in Malaysia? It is very possible as I read that The Institute for Transportation and Development Policy (ITDP) has helped to develop the bike parking station.
ITDP is a US-based non-governmental non-profit organization that provides technical assistance to cities and local advocacy groups on sustainable transportation development throughout Asia, Africa, and the Americas.
Why should we consider working towards developing bike parking station like this in our country? Take a look at this chart created by ITDP and you will see the picture.
Let's share this information and hope that the relevant authorities will pick this idea up.
Monday, December 23, 2013
Tuesday, December 17, 2013
Clattering sound when cycling?
If you hear a clattering sound when you are cycling but don't see anything stuck on your chainrings, that could cause the noise when you checked, it is likely the sound of your chain rubbing against your derailleur.
To verify if that is the cause, check where your gears are at when the noise starts. Is your chain sitting on the larger chainring while the other end is sitting on the largest ring of your cassette? If it is, look at your rear derailleur. You will notice that it is stretched way forward.
If your chain is sitting on the smallest chainring while the other is sitting on the smallest ring of your cassette you will noticed that the rear derailleur is stretched way backward. That means that you are cycling on extreme gear combinations and the grinding noise you hear is the chain rubbing against your rear derailleur.
This cross chaining process puts the chain at too much of an angle which adds tension and can cause your chain fall off the bike and wears it out faster than it should.
So now you know that you should avoid the following combinations:
Front gear is at 1 while back is at top gear
Front is at 3 while back is on lowest gears
Watch this video and you will have an idea of what I am talking about.
To verify if that is the cause, check where your gears are at when the noise starts. Is your chain sitting on the larger chainring while the other end is sitting on the largest ring of your cassette? If it is, look at your rear derailleur. You will notice that it is stretched way forward.
If your chain is sitting on the smallest chainring while the other is sitting on the smallest ring of your cassette you will noticed that the rear derailleur is stretched way backward. That means that you are cycling on extreme gear combinations and the grinding noise you hear is the chain rubbing against your rear derailleur.
This cross chaining process puts the chain at too much of an angle which adds tension and can cause your chain fall off the bike and wears it out faster than it should.
So now you know that you should avoid the following combinations:
Front gear is at 1 while back is at top gear
Front is at 3 while back is on lowest gears
Watch this video and you will have an idea of what I am talking about.
Labels:
chain,
chainrings,
combination,
cross chaining,
gear,
noise,
rear derailleur,
tension,
video,
wear,
youtube
Wednesday, November 20, 2013
Ride Smoothly with Q20
First, let's remember what is rusting your bicycle parts which creates friction between the moving surfaces and makes your rides not that smooth. WATER!
If you have been religiously lubricating the moving parts of your bicycle but you are still not happy with the result, it's time to change your lubricant.
I read that a typical lubricant contain 90% base oil and there about 10% of additives. So, oil being lighter than water will sit on it which explains why metal parts on your bicycle will still be oxidized. So, what you have to do now is to find one that is heavier than water so that it can dislodge any remaining moisture on your bicycle parts.
And this is what you should be looking for.
If you have been religiously lubricating the moving parts of your bicycle but you are still not happy with the result, it's time to change your lubricant.
I read that a typical lubricant contain 90% base oil and there about 10% of additives. So, oil being lighter than water will sit on it which explains why metal parts on your bicycle will still be oxidized. So, what you have to do now is to find one that is heavier than water so that it can dislodge any remaining moisture on your bicycle parts.
And this is what you should be looking for.
Need proof that it works? Watch this video and promise me that you will not try it at home as I need you to keep coming back to my shop.
Labels:
interesting,
lubricant,
multi-purpose,
Q20,
rust,
stop,
video
Friday, November 15, 2013
DO IT YOURSELF FOR REBATES
Watch this video and learn how to change your own bicycle tyre or tube.
Why? If you fix your puncture personally, you will get a RM4 rebate off any tyre or tube you purchase at:
Jom Johan Trading and Services
No 43A, Jalan Prima Saujana
1/1A Taman Prima Saujana Sek 1 43000
Kajang, Selangor
Malaysia
Some points to note:
1) Before removing your current tube, pump in some air to see if it can be inflated.
2) Before you install the new tube, inflate it a little to check the surface for any defects.
3) Check your rim to see if there are any protruding spoke that could puncture your tube again. Ask the staff at Jom Johan to show you how to create a rim tape if it is required.
4) Check the outer and inner casing of your tyre to remove any embedded sharp object, such as, glass or nails.
5) Before you finish up by inflating the tube, make sure that it is fully inserted into the tyre and not sticking out of the rim.
6) Do not over inflate the tube as it can burst up like a balloon. Good for shop owner but not for your pocket.
Use the proper tools to remove and install tyres and tubes to prevent scratching or damaging the rims of the wheel or even puncturing the new inner tube you are installing.
This is one of the bicycle tool kits you can consider using as it comes with metal tyre levers.
If you would like to borrow tools available at the shop, be nice to the owner by telling how much you
Why? If you fix your puncture personally, you will get a RM4 rebate off any tyre or tube you purchase at:
Jom Johan Trading and Services
No 43A, Jalan Prima Saujana
1/1A Taman Prima Saujana Sek 1 43000
Kajang, Selangor
Malaysia
Some points to note:
1) Before removing your current tube, pump in some air to see if it can be inflated.
2) Before you install the new tube, inflate it a little to check the surface for any defects.
3) Check your rim to see if there are any protruding spoke that could puncture your tube again. Ask the staff at Jom Johan to show you how to create a rim tape if it is required.
4) Check the outer and inner casing of your tyre to remove any embedded sharp object, such as, glass or nails.
5) Before you finish up by inflating the tube, make sure that it is fully inserted into the tyre and not sticking out of the rim.
6) Do not over inflate the tube as it can burst up like a balloon. Good for shop owner but not for your pocket.
Use the proper tools to remove and install tyres and tubes to prevent scratching or damaging the rims of the wheel or even puncturing the new inner tube you are installing.
This is one of the bicycle tool kits you can consider using as it comes with metal tyre levers.
If you would like to borrow tools available at the shop, be nice to the owner by telling how much you
Monday, September 23, 2013
Punctured your tube?
Watch this video and learn
1) how to remove and re-install your rear wheels off your bicycle
2) about the convenience of getting rear wheel quick release for your bicycle
3) how to remove tyre and inner tube off the rim
4) about the convenience of using the right tyre levers
5) how to fix a punctured bicycle tube with a cold patch
You can get this
1) how to remove and re-install your rear wheels off your bicycle
2) about the convenience of getting rear wheel quick release for your bicycle
3) how to remove tyre and inner tube off the rim
4) about the convenience of using the right tyre levers
5) how to fix a punctured bicycle tube with a cold patch
You can get this
at
Jom Johan Trading and Services
No 43A, Jalan Prima Saujana 1/1A
Taman Prima Saujana Sek 1
43000 KajangSelangor
Malaysia
Labels:
bicycle,
cold patch,
free tutorial,
inner,
Jom Johan,
puncture,
quick release,
re-install,
remove,
tube,
tyre,
video,
wheel,
youtube
Thursday, September 12, 2013
Unfolding your Doppelgänger
If you bought yourself the Doppelgänger folding bicycle from Japan like this model,...
...you need to learn the special safety mechanism it has to unfold one.
Yes, they also have full suspension foldable bikes running on 26" wheels.


I know, because they are selling at:
Jom Johan Trading and Services
No 43A, Jalan Prima Saujana 1/1A
Taman Prima Saujana Sek 1
43000 Kajang, Selangor, Malaysia
Tel: 03-87369398 / 012-3867558
Yes, they also have full suspension foldable bikes running on 26" wheels.


I know, because they are selling at:
Jom Johan Trading and Services
No 43A, Jalan Prima Saujana 1/1A
Taman Prima Saujana Sek 1
43000 Kajang, Selangor, Malaysia
Tel: 03-87369398 / 012-3867558
Wednesday, August 7, 2013
Stay safe. Lights up!
If you are out riding your bicycle at night, make sure that you can be seen by fellow road users.
You should have a tail light or rear bike light like the following which comes with a USB adaptor for recharging the Lithium polymer battery. It has two types of mount so that you can decide if you would like to locate it at the saddle or seat post.

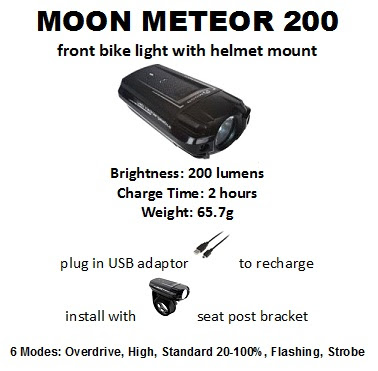
There are models that also come with helmet mount. What is the point of mounting your headlight on your helmet? Without moving your bicycle, you can shine the light in the direction you are looking at.
You should have a tail light or rear bike light like the following which comes with a USB adaptor for recharging the Lithium polymer battery. It has two types of mount so that you can decide if you would like to locate it at the saddle or seat post.

There are models that also come with helmet mount. What is the point of mounting your headlight on your helmet? Without moving your bicycle, you can shine the light in the direction you are looking at.

Subscribe to:
Posts (Atom)
+Chart.jpg)